There are a lot of people new to cycling who are not aware that a
bike chain is considered a "consumable", that is expected to
be replaced periodically.
They usually find this out when their bike no longer shifts
smoothly, or they experience chain slip while pedaling. (If this
occurs while standing, it can be very painful as you come crashing
down on the top-tube of the bike).
Often, you can get away with ignoring your chain except for a
little oil now and then, but you will come to regret this.
When chains wear, there is often no easily visible indication that
they are doing so. They seem to look just the same as when new,
just a little dirtier. But chains wear in an odd way: they
"stretch".
Now chains don't actually stretch in the normal sense of that
word. If you measured an old and a new chain, each link of the
old worn chain will be the same length as a link on the new chain, yet
the old chain will be longer. You could painstakingly
count the number of links to make sure that there were the same number
of these same sized links. Yet, the old chain would still be
longer.
The secret: Chains wear out the connecting pins that
hold the links together. The pins get ground down by all the grit your
chain picks up from the road.
This wear is hard to see because it's hidden between the two outer
chain side plates.
The two outer side plates are friction fit to the chain pin, and
wear does not generally occur there. The two inner plates are
meant to swivel around the chain pin each time the chain goes around
the gear. This repeated motion slowly grind the pin diameter
down.
| Slowly, over time, the effective diameter of these pins gets
smaller, and in some sever cases they get groves in them. In
addition, the holes through the inner set of side plates (or the
bushings in those holes) become slightly oval shaped.
Chain "stretch" then, is simply the accumulation of
a tiny bit of wear over many pins. Normally, a chain link is half
an inch from pin to pin, and one full inch from the start of one link
to the start of the following link (Yup, it's measured in
inches, not centimeters, it's always been this way). When the
pins wear, the overall distance between them gets further |

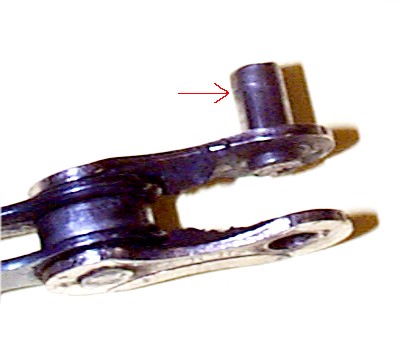
This image shows wear on the pin.
Note the grove indicated by the arrow. This wear was
caused by about 2000 miles of riding in a gritty
climate. Click image for larger view.
|
So What?
Who cares if the chain "stretches"? You do (or you should) and here's why.
| A worn chain measures just a tad
longer between the pins, and does not mesh well with the gears
on the bike, all of which are carefully made to mesh perfectly
when the pins are half an inch from each other. As the
pins move further from each other they come to rest on a
different part of the gear tooth. Instead of nestling
smoothly in the hollow between gear teeth, they land on the
face of the following gear tooth, and start to wear that tooth
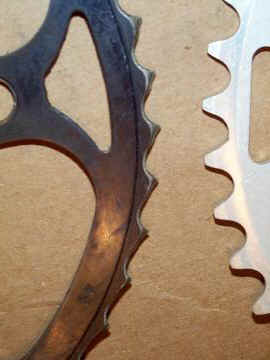
down. The photo at right shows what can happen if you
let it go.
The black chainring was from a neglected (but often ridden)
bike, and the silver colored ring is new. Note the ugly
wear pattern, where the leading edge of each tooth is badly
worn down. This bike had a bad case of chain skip and
poor shifting. |
 |
Putting a new chain on worn chain rings will yield worse chain
skip. So neglecting the chain means you not only get to replace
the chain (fairly cheap) but now you also have to replace the
chain rings and probably a few cogs on the rear gear cluster as
well. This can get expensive, especially if your rear cogs need
to be replaced. It's much cheaper to replace the chains in a timely manner.
How Often to Replace Chains
The rule of thumb is you should replace your chain BEFORE a foot of
chain has stretched to the point where it is a foot and one eight of
an inch.
Checking this is Simple:
- Shift to the big-big gear combination. (Gives a nice long place
to measure).
- Lay your bike on its left side.
- Lay a one foot ruler or tape on the top run of chain such that
the Zero mark is dead center in one of the chain pins. Hold
it there very steady.
- Check the other end of the ruler. On a new chain it will
be dead center on another chain pin.
- If the chain pin center is less than 1/16th beyond the end of
the ruler it's OK.
- Between a 16th and an 8th, you should think about changing the
chain at the earliest convenience.
- If the chain pin center is 1/8th of an inch beyond the end of
the ruler it is past time to change your chain.
You may get anywhere from 2000 miles to 20,000 miles on a bike
chain before it needs replacement. It all depends on how much
grit and dirt accumulate on the chain and your style of
pedaling.
Tools you will need:
Bike shops have a nifty tool measuring chain "stretch"
but it is no more accurate than a good ruler. You can have them
double check your measurements when you ride down to buy your new
chain.
You can have them install a new chain for you, or you can do it
yourself. It's a skill that may be good to know in case you break
a chain miles from anywhere.
| You need a Chain Tool. A Chain Tool
is used to push the pin out of the chain so that you can take
out links to make it the right length. You need to do
this with each new chain. Expect to pay under $14 for a
good chain tool. |
  |
There are several models to choose from. I prefer one small
enough to be carried in my bike bag.
There are no common household tools that do a satisfactory job of
removing and re-inserting chain pins. You really do need this
tool.
Note that there are some brands of chain that come with a
"easy open" link. These often require no tools to open
the chain. When clogged with gritty oil, these can be difficult
to open, and the quickest way may still be the chain tool. Even
with an easy open link, you need a chain tool to adjust the length of
the new chain.
Other useful (but not essential) items for this task include a pair
of surgical gloves (buy a box at your drugstore), and a small U shaped
piece of stiff wire (coat hanger) that can be used to supply some
slack in the chain by pulling links together so as to make a loose
"belly" in the chain. Note that the chain tool
pictured on the left (above) comes with such a piece of wire.
They are easily made however.
Take the Old Chain Off
Taking the old chain off of the bike is the first task that
requires a chain tool.
Before you get started make a mental note of how the chain runs
thru the Derailer if this is the first time you've changes a
chain. You need to get it back that way when installing the new
one.
Here's how to use the chain tool. Position the chain
across the slotted jaws of the chain tool such that one of the chain
pins aligns with the slot. Then screw the pin extractor till the
mandrel comes in contact with the chain pin. Make sure
everything is aligned perfectly, and then start turning the handle
pushing the pin out.

Don't push the pin all the way out.
If you do, it's very tricky to get it back in. Always stop when the
pin is hanging out of the side plate opposite the mandrel. How
do you know when to stop? Well go slow, and remember the pin
is as wide as the chain, so almost that width will be hanging out
when it's far enough. Also, there will be a slight increase in
resistance when you are "far enough". This
resistance is caused by the ends of the pin being ever so slightly fatter than the
middle, and this fat part has to squeeze thru the side plate.

Periodically stop before you push the pin all the
way out and see if you can pull the chain apart yet. (It's ok
if the pin extends a bit on the inside of the plate, because
slightly bending the chain from side to side will overcome
this). Removing the OLD chain from the bike is the proper
time to experiment with this, not on the NEW chain. After a
couple tries it becomes second nature.
As you finally break the chain, if this is the first
time you changed a chain WATCH the Derailer. It will swing
back. Carefully note how the chain was routed through it. It
looks different in this swung back mode. You have to route it
the same upon re-assembly.
Hang it Up
Ok, now you have that old filthy chain off. Don't toss it
just yet. We will use that chain to adjust the size of the new
chain. (Chains always seem to come a few links longer than you
need). You can count the links in the old and again in the new
chain, and then use your chain tool to remove the excess
links.
| But my quick way is to take old and
new chain and hang them on a horizontal (headless) nail that I
pounded into the garage for this very purpose. Hang them from
the end of the chain that does not have the chain pin
protruding.
In the picture at right, the old chain is against the wall
and the clean new chain is nearest the camera. Note that
the links of the chain all line up at the top of the chain.
But because of chain "stretch" you will see that
the don't line up when you get farther down the chain.
In severe cases this will cause you to miss-count the
number of links and your new chain will be one link too long
when you install it. |
 |
| Here you can see that near the
bottom of the chain, the links are off, with the old chain
pins hanging half way down the link of the new
chain.
To get the correct number or links, you need to go down the
chain with your fingers lifting the old chain when ever
it drifts out of alignment with the new chain. Lift it
till its pins line up. Then move down a bit further, and lift
again. You can quickly do this lift and align trick,
(about three times I've found) till you arrive at the bottom.
Grab link of the new chain that corresponds with the bottom
link of the old chain.
Note which pin you have to push this link by comparison to
the old chain. It will be the bottom most pin as the
chain hangs on the nail. |
 |
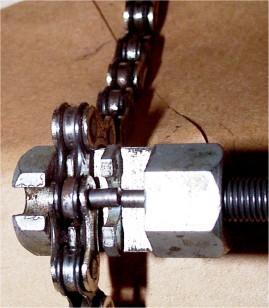
Now, reach for your trusty chain tool and push that pin ALMOST
out. Here is where you will really kick yourself if you push
it too far. In fact if you do, it's easier to punch the next
pin up (on the big piece of chain) all the way out, discard the two
side plates that will thusly be freed, then flip over
the small piece of chain and re-join it to the big piece, and then
CAREFULLY push the pin at the opposite end of this same link almost
(but not quite) out. Take my word for it, this is easier than
trying to convince a loose pin to go back into the side plate.
You should end up with something like this.

Note Pin could have been pushed a tad
further, but this was enough to bet the chain apart.
The pin should be sticking out of the LONG piece of chain and the
short piece can be discarded. If the pin is sticking out
of the short piece of chain, you pushed the wrong pin out, and you
will have to re-join the chain (see below) and push the other pin
out.
Put the New Chain On
Now it's time to put the chain back on the bike.
After adjusting the size of the chain, you have to put it back on
the bike. Since the chain passes through the frame's rear
triangle, you can't just assemble the chain and then put it on the
bike.
I find it's easiest to do this with the bike laying on its left
side.
Note: if your Derailer pulleys are excessively worn now
is an excellent time to replace them. Get a new set from
your local bike store (you need to tell them the name and model
number of your Derailer). You may need an Allen wrench to
unscrew the bolts that hold them in.
It's easiest to do this is string the (as yet un-joined) ends thru
both detailers, in roughly the normal path of the chain. But
first run the front Derailer all the way in (over the smallest chain
ring) and shift the rear Derailer over the smallest cluster gear.
This way, you will have the maximum slack to work with instead of
having to fight the spring tension of the rear Derailer.
String the chain through the front Derailer from the rear, and to
the side of the smallest chain ring (missing both chainrings altogether,
just lay it on the bottom bracket next to the chainrings). Let
enough hang down to get half way to the rear Derailer.
| String the other end of the chain over the rear
side of the smallest cog, in FRONT of the upper Derailer
pulley, (remember you have to pull the Derailer arm (some
times called a Derailer cage) down to its normal position
against its spring). Then down to and BEHIND the lower
pulley and toward the other end of the chain. (See red-line at
right)
Watch out for metal tabs on some models of Derailer
arm. Don't loop over these tabs, go behind them, between
the left and right arm-members. |
 |
Now you are ready to join the two chain ends
together. Carefully push the narrow end of the chain between
the side plates of the other end. Align it so that the pin is
in line with the hole in the link.
| Use your chain tool to drive the
pin back in, as shown here. If you are careful when
stringing the chain back on the bike, the pin will be pointing
away from the bike, making it somewhat easier to use the chain
tool. It's no big deal, though, and you can have the pin
pointing either way by simply turning the chain over before
you string it.
Push the pin in till it is flush with the other side, and
no further. Remove the chain tool.
You will find the chain is stiff at this link. That's
because the side plates are pushed tightly together by the
chain tool. Flex the chain by bending it with your
hands. |
 |
Bend it up and down (they way it was designed to
bend) and also left and right, (the way it wasn't meant to
bend). This will free up the side plates so that the chain
will flex a bit easier. Sometimes a small regular screw
driver blade can be inserted between the outer side plates and
twisted just slightly to push the plates apart giving smooth chain
movement.
Now put your chain on the front chainring, and crank
it around a few times slowly. Watch for kinks going thru the
rear Derailer. If the Derailer jumps or twitches, it's a sign
that the link you joined is still stiff.
Oil your New Chain.
The grease covering your new chain is primarily a
rust inhibitor, and does not provide proper lubrication. Oil
it with 1 drop of oil at each of the pins (applied to the top of the
chain). Then wipe off any excess.
No Derailer?
If your bike is a single speed, or has a geared rear hub, the
procedure for replacing your chain is different only in a small
way.
You might be able to get the old chain off without loosening the
rear wheel because of the chain "stretch", but you will have problems getting the new chain on because it may be too tight
to get the final pin in. If so, loosen the bolts that hold the
rear wheel, and slide it forward or dismount the wheel
entirely.
When replacing the wheel don't pull the chain so tight that there
is no play in it. You should be able to pull the bottom run of
chain down about half an inch to a full inch. If not, it's too
tight, and will wear your gear unnecessarily.
No Old Chain?
Sometimes you have to put a chain on a bike and you don't have
the old one to use to get the new chain length correct.
This can happen when you are building a new bike from parts, or
you break a chain while out riding and neglect to bring the pieces
home.
In this case, wrap the chain around the largest front chainring,
and over the largest rear cog, and thru the Derailer. Then pull the
ends together on the bottom run of chain, over lapping them, until
the rear Derailer arm is pointing as far forward as it will
go. Be sure to pull these two chain ends in-line, not down, or
to the side, but follow the natural path the chain will take.
Mark the link that lines up with the end of the chain when the Derailer
arm is fully forward. You need a little excess length in the
chain to facilitate shifting, so add two links minimum, maybe three
if your Derailer spring is really stiff.
It's A Snap
Changing a chain is a snap with the chain tool (and almost
impossible without one). It pays to be able to do this work
yourself, and it's not difficult. The chainrings and cogs you
save by changing your chain are way more expensive to replace.
So grab your ruler and run over to your bike and measure your
chain. If it's too long, instead of paying the bike shop to do
this (every time), pay them for a chain tool (once) and do it your
self. It's a 10 minute job, and a skill worth knowing.
|